

WordPress is the easiest way to create a website. Many of the best web hosting firms offer you the best web hosting services. A maximum web hosting provider offers WordPress web hosting. But in the Hostgator web hosting plan, you will get free WordPress web hosting services. You can easily install WordPress in shared web hosting, VPS hosting, and other web hosting. With the WordPress hosting plan of services creating a blog becomes too simple and easy for users. Only in a few minutes, you can install WordPress in any Hostgator web hosting plan.
Before installing this if you are thinking how much time this will take to install WordPress Hostgator. Here you will get a solution to all the questions that you are facing before using Hostgator free WordPress services.
How long does Hostgator take to install WordPress?

If you are going to install WordPress then it only takes 5-10 minutes to install. The process of installing WordPress is too simple for any user. A beginner is also able to install WordPress in Hostgator in a few minutes you only have to follow some steps to install WordPress in Hostgator.
If you want to buy a web hosting plan from HostGator and want to install the WordPress free of then follow the steps I am going to explain in this blog.
Also, Read… How to add Https on WordPress of Hostgator?
What are the steps to install WordPress in Hostgator?
Install WordPress services on Hostgator shared web hosting plan. This content aims to guide all the users who want to add the services of Hostgator in its hosting plan in less than 15 minutes. If you fo with the mentioned guidance then you can easily install WordPress just in a few minutes. The steps to install WordPress are:-
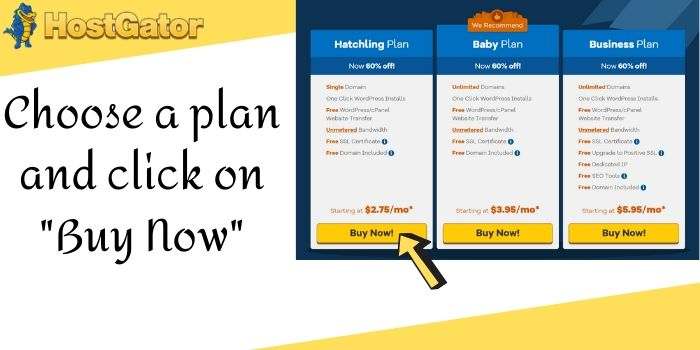
- Visit the Hostgator.com Official site

- Choose the web hosting section and choose a plan between Hatchling, baby, or business. If you want to start with the nominal cost then you choose the Hatchling plan.
- After selecting a plan, on the next page fill the required information that Hostgator asked before shop a hosting plan.


- Select a domain name & extension as you want.
- Choose a hosting plan, price, and type username & password in it.
- Enter your billing information email, name, company, phone number, address, and select the payment option from credit card & PayPal.
- Add additional services as per your requirement.
- Enter a Hostgator Coupon Code to save the maximum amount.
- Review the order details as per your selected information.
- Click on the terms and condition box and click on the Checkout Now.
This one is the process to buy a hosting plan from Hostgator. With the help of the above steps, you can easily own a web hosting plan for the Hostgator.
“Check your email account you will receive a link to login into the Cpanel. You will also get a username and password for login.
Now learn steps to install WordPress in Hostgator
- Login into the HostGator Cpanel.
- Find the software section and click on the quick install.
- Click on the WordPress option appear on the screen
- Write the domain name on which you want to install WordPress.
- On the next page write the blog title, Admin users name, First name, Last Name, Admin Email, check the terms and services box and click on the install.
- Once WordPress installed then you will receive the login user name and password.
- Click on the login button and fill username and password and click login. Congratulation you successfully login into the WordPress site.


Through this process, you can easily install WordPress in Hostgator just in 10 to 15 minutes. So go with the mentioned detail and save your time and use the services of WordPress easily.